Tuesday, December 27, 2016

Bad news and then some good news

The  reliquary is coming along, but not without its's problems.  For some reason I chose to start with the fuchsia pink, and using a silver metallic. I chose one of the shapes from the book, but altered the proportions and size, drafting my own pattern.  My original vision involved white and silver, but most of the beads I could find were more toward raspberry, so we added that.  I was trying to find some sort of theme, and the darn piece kept refusing to cooperate. After several days of anger and frustration, I went back to that old design guideline--If nothing seems to be working get rid of your very favourite component.  So I agreed to try gold metallic instead of silver.  The piece was ecstatic!  Ah, but which gold?  Do you have any idea how many golds there are?  After some experimentation, I went with Lumiere Halo Pink paint.  Dry brushed a little on the the base--ho hum.  So I painted some onto a crumpled up paper bag, and added appliqued (fused) shapes to the piece.  A little better, but not really satisfying to any extent.  So could I find some raspberry metallic to applique the shapes to the piece?  Oh Joy!  I found some.  I quickly did the machine applique, and went to bed happy.

Next morning, in day light, I realized that the Raspberry metallic, did not read as raspberry when used, but rather read as purple. Oh darn!  ( Not really what I said.  Use your imagination)  How can I save this?  Back to the stash, where I found some purple silk.  What the heck?!  I can't make it any worse.  Well, I did.

At this point I was ready to throw in the towel.  But, could I really  throw away all this time and supplies?  Why not use the piece to experiment with various techniques, before moving onto a new project (  Remember?  I had three other colourways  ready to go.)  So I relaxed, and let loose, and allowed myself to play.  First I did a small scale random FMQ'g all over the base layer with gold metallic--great results.  Then I added machine couched Japanese gold around the appliques. (Yes, real Japanese gold) Next I added custom-made braid along the edge of each of the five sides, and a similar braid along the bottom.  Here is a close-up of the piece, that shows detail of the FMQ'g and the braid.


Here is the full view of the result, all the machine sewing done, ready for beading.  I am pleasantly surprised at the result, and plan to finish it as originally planned.  I'll post more pictures once the beading and hand stitching is done.


I plan to link this with The Needle and Thread Network and Nina Marie Sayre's Off the Wall Friday.

Sunday, December 18, 2016

Starting new

After a lengthy time finishing projects to get ahead of deadlines, I have reached the point where I can allow myself to start a new project. Several things come to mind, and there are a couple of ongoing projects that I'll keep working on in the background, but I've decided to start a new reliquary.  The reliquaries I make are purely for my own enjoyment.  I only rarely show them to others, and haven't worked on one for over a year.  The concept and technique that inspires them can be found in the book "Beginners Guide to Embroidered Boxes" by Janet Edmonds, but the patterns and designs are my own.

The first step is to gather supplies.  The base is always 
Duipionni silk, backed by felt.  Depending on the size of the design, there may also be a layer of interfacing.

Then I pick thread, both matching and contrasting.  Next is embellishments.  This can involve beads, cabochons, metallic threads, and anything else that takes my fancy.  This time I hope to include some polymer clay faces that I made awhile ago.  I'm thinking of covering them with metallic leaf, once I settle on the metallic I want to use.  I have made a rule for myself--only one metallic per piece.

Working from my stash I have put together four potential pieces.  The critical point turned out to be beads.  This is my bead stash, and you wouldn't think I would have trouble finding a bead to match every possible option, but I had great trouble finding beads to match a light fuchsia silk I bought today.  I may have to take that colour out of the running for now.


 So I have fuchsia and dark teal, silver/gunmetal grey, and lilac, all with the beads I have tentatively put with them.


Next are the metallics, mainly various hand threads.  Machine threads are the next step.  Right now, in my decision-making, I'm leaning toward the teal with silver, or the grey/gunmetal with silver.


I'll post my progress with this, but each piece takes about 3 months of intense work, so it won't be too soon!

I plan to link this with The Needle and Thread Network, and maybe Nina-Marie Sayre's Off the Wall Fridays.

Monday, December 5, 2016

Taming Chaos

This weekend, circumstances dictated that my basement studio get some TLC.  This took two full days.  A car load has gone to the local thrift store, and there is a large laundry basket full, and headed for the same place.  I have pretty well filled my big recycling bin. This was an emotional experience as it meant letting go of  all of the projects that have been saved over the years, in hopes that my physical health would improve to the point that I could take them up again.  I have known in my head that the day would come, but up until now had not accepted it in my heart. The biggest surprise to me, was the sense of relief I found myself experiencing, as they went through the door.  Many other items are put aside for friends, and I look forward to seeing them to new homes, over the next couple of weeks.

One thing I found was a partially assembled Storm at Sea quilt that I started in 2004, using fabric that I acquired at Quilt Canada 2004, which was here in Winnipeg.  I quickly accepted, that I would never finish it, but realized that enough had been put together that I could re-purpose it for a small charity quilt.  It took about an hour, but the top is together and I'll try to sandwich it ready for quilting this week.

Here are some pictures, in progress.


I plan to link this with the Needle and Thread Network

Sunday, November 27, 2016

Sunday's dye bath

Unfortunately, this dye bath was less successful than the previous one. The rectangular piece, again 18" by 24" doesn't have much that would make it distinctive.  


The most interesting part is the blue on the right side.

There are areas showing the distinctive Shibori tying.  Most of this will probably end up as pieces in a quilted hanging or a charity quilt.


The mandala shape has even less to recommend it.  This will certainly be re-purposed in some way, even if the distinctive Shibori tying is also obvious in a couple of places.  I really don't like this one.


I plan to link this with The Needle and Thread Network, and Off the Wall Fridays with Nina-Marie Sayre

More Shibori-Saturday's Ice Dyeing

My experimentation with ice dyeing continues.  This time I have tried a combination of nui Shibori and tesuji Shibori, and I'm well pleased with the results. I have done a long narrow piece and a mandala-based piece, using only grey and teal Procion dye, in the ice bath. All of these were photographed lying over my ironing board, so there is some distortion.  Sorry about that, but my design wall, where I usually take photos, is covered with another project.

Here is an overall photo of the long narrow piece ( about 18' by 24")

 And here is a close-up, showing the distinctive lines produced by the string used to wrap the fabric prior to dyeing.  This is sometimes considered desirable, as it proves that the technique is true Shibori.  I also love the way the dye has separated into some of its composite colours

This is an overview of the mandala-based piece--about 18" square


And again a a couple of  close-ups showing the distinctive lines of the wrapping, and the way the dyes have separated.


While the result is beautiful, and I'm going to keep dyeing, the question has been asked  "What are you going to do with it?"  I guess this is always a problem when one becomes obsessed with a technique.  Well, when I have removed my pieces from the dye bath, I often use the leftover dye to colour a LWI dye bath.  This will give me fabric that can be used either for backing or binding.  I have also made dye baths for some, or each, of the colours used in the ice dyeing bath.  This can be used in piecing a hanging, that utilizes the ice-dyed fabric or pieces from it.  Yes--I am willing to cut into these beauties.  The end result is truly "one of a kind".

Here is the larger LWI dyed piece.  The top picture is truer to the actual colour.


Wednesday, November 23, 2016

A cautionary tale or serendipity?

I have been attempting to create a stylized sunset using complex Shibori folding techniques, and ice dyeing.  This is the first step in creating a finished piece for a themed gallery show to which I am committed.  I bought some over wide muslin, labelled as plain unbleached muslin, and carefully manipulated and wrapped two large pieces, so as to have two potential pieces to work with.  One was very tightly wrapped and the other more loosely.  I thought everything  had been carefully planned, was under control.

Imagine my shock when I opened the dyed pieces and found this.
instead of this, which is close to what I was anticipating.  ( This is the back of the fabric, and the final dyeing pattern is somewhat different--lighter, IMHO)

Now, I have arthritis, in my hands, and the folding and wrapping is a major chore for me.  It took three days to do these two pieces. 

I was PO'd.  Taking another look at the fabric, I cannot detect this pattern, but regardless, the labeling was false.

My husband wandered in to see what the bad words were all about, and fell in love with the patterned side of it.  So I took another look, and thought about it, and decided--what the heck?  Why not use it and consider it more abstract than stylized.  So what if I've got a starry sky behind my sunset?  I think it could be a lot more fun this way.

I plan to link this with The needle and Thread Network, and Nina -Marie Sayre's Off the Wall Friday

Sunday, November 13, 2016

More traditional work

As part of my "Clean out the Crap" activities, I've gone through several of my big plastic totes of commercial fabric, and selected the smaller, or scrappier, pieces to cut into hexies.  I hand stitch these while watching tv, or whenever the need to pass time arises. 
( I basted over 100 of them yesterday at a craft sale.) I've posted about the few project bags that I've finished, and even sold a couple of them.  But now I've been overwhelmed with hexies, and needed a better plan.  They are very much multi-coloured, and I've struggled for a while now, trying to figure out how to put them together in some way that my artistic heart approves of.   There are just too many to limit myself to project bags.  So I've decided to see if I can produce a single bed size quilt, using the larger hexies ( at this point I've basted over 400 of them, but only need 68 for a large tri-angular project bag).  Considering the number of dark brown, dark blue and black pieces there are, I decided that Grand Mother's Flower Garden was not in my future, but maybe a "lozenge" design might be.  I did a bit of a trial run, and think I've found my solution.


I may have to do some "compensation" around the edges, but I think this is going to work, and will make good use of the various colour groups, if each "lozenge" is made up of very similar colour and value.

Yesterday was the craft show I've posted about previously.  Not very successful, although I did sell enough to make expenses.  My husband and I have done a lot of these in past years, and have taken the attitude that this is our recreation, and as long as we meet expenses, the day can be called successful.  In addition, I did get those hexies basted!

Sunday, November 6, 2016

New work

 Several years ago I received a large shoe box packed full of cotton Damask table napkins.  Some appeared to have never been used, others appeared well used.  They were not all the same pattern, nor the same size.  They had come from the estate of an elderly lady--well into her nineties when she died.  I know little about her other than her last name, and that she liked to collect salt and pepper shakers.  Her Daughter-in-law, knowing that I sometimes liked to experiment with dyeing cotton Damask, gave them to me.  One of my most recent dyeing experiments produced a very beautiful blue-grey, and I have matched it with a red-orange of a very similar value, in this piece.  I'm calling it "Remembering", thinking, not only of this anonymous woman who obviously treasured her napkins, but also of the many of her generation who equally treasured their cloth napkins, wedding silver ( usually silver plate), and good china--all things that now appear to have lost any value in today's society.  I have aimed at a fairly peaceful mood, in using the muted colours, as I  think life was more peaceful and more slowly paced for much of her lifetime, especially for women.  ( I have not forgotten that many of these women lived through both the Depression and the Second World War, I'm thinking more of their lives as wives and mothers.)

Here is the full view.  The piece is 20" by 20", and "gallery wrapped.


Here is a close-up.  Working with cotton Damask in this scale is very tricky, because of the very loose weave of the fabric, so every piece had to be interfaced for control. Trying to do the satin stitch, around the tear drops, by machine, was a horror.  Just not feasible. So I did them separately, then cut them out and fused them.  


The back is enclosed, and labelled.  The edges had to be sewn, by hand, using a curved needle.  That job took about 3 hours.


I plan to link this with the Needle and Thread Network, and Off the Wall Fridays with Nina Marie Saryre

Wednesday, October 26, 2016

Still Stitching

In my last post I mentioned that my husband and I had gone through all of the fabric art pieces I had stored in the basement and re-purposed some of them into smaller pieces that could be sold at a craft show. I've avoided craft shows over the past few years, believing that they're a lot of work for not much return, as people expect to buy hand made things for less than the cost of supplies.  But, I've also said that I would rather sell things  than donate them to a thrift store.  So I've devoted this week to re-purposing some of my older hangings.  I have small zipper pouches, even smaller zipper pouches, coffee cuffs ( these have been hanging around from sales long, long ago), and the fancy knitting/project bags I've been working on in the evenings for awhile now. I have set prices on them, and will be taking them to a sale Nov 12th, just as a sort of trial run.  Wish me luck.


I plan to link this with The Needle and Thread Network.

Friday, October 21, 2016

and which way is up??

Just when I thought things were under control, my husband suggested that we go through some of the finished hangings that are stored in the basement, and see if we could dispose of any of them so as to get rid of the clutter. I really, really didn't want to do that, but recognized that it was part of a long term ( very, very long term, IMHO) plan to simplify our lives. We were able to find several, enough, in fact, to reduce the stash to two wrapped rolls that will easily fit in one trunk.  Most of the others will be re-purposed into smaller more functional items like tote bags and small purses. These have sold well over the years at craft sales and informally to friends.  So my next task was to find some sort of sale, which I did.  OMG!  In three weeks!!! So starting yesterday, and continuing into the near future, I will be chained to my studio re-configuring precious intensely worked art-quilted hangings into items that will --hopefully--sell for a pittance.  The option was to donate them to a thrift store which would have broken my heart.  At least, if I do make any money, I can spend it on supplies to make more.

Isn't that the definition of insanity?  To keep doing the same thing over and over again and think the results will be different?

Wednesday, October 12, 2016

Another finish


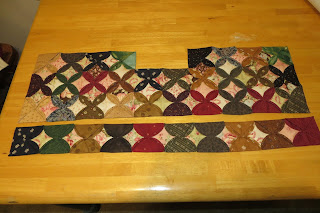
In early August, I posted this picture of a hand sewing project.  Yes, Cathedral Windows, with the background squares being about 4' by 4"--relatively small. It was very slow progress, as this pattern takes a lot of time to do properly. All that is left to do here is to attach and finish the row shown, and to make two short pieces, as are on the top, to sew to the bottom.  Then the whole thing had to be sewn together and a draw string top added. This description really is a simplification, as the finishing took almost as long as the original piecing


 But here is the final result. Finished it today. This is actually quite a large bag, as it was intended as a knitting bag and had to be big enough to hold a project, as well as the needles etc to work on it. 
I plan to link this with The Needle and Thread Network

Tuesday, October 11, 2016

Not as easy as I thought

In my last post I talked about enjoying my social network, as so much of it relates to my creative life.  Serendipitously, an opportunity came up to join an informal sketching group, one of the areas I want to experience.  Today was the first meeting.  One lady had taken it upon herself to set up an organizational system, that required each of us to accept responsibility for providing instruction for one of the sessions, over the next few months, and for each of us to submit a sketch for critique at each session.  I had anticipated a much more informal set-up, where I could progress at my own speed, starting at my own skill level, with hopes of improving that level.  As well, most of them were asking to concentrate on aspects of figure drawing, not something I'm looking for at all. While I realize that figure drawing is an important aspect of sketching, I do not believe I am skilled enough to experience any success with it at all, and without some sort of positive experience, I would quickly become discouraged.  That skill level might come in the future, but I'm not there yet.  Nor do I use figures in any of my fibre work, most of which is more abstract.

So when the organizing lady turned to me and asked when I would take on all of the preparation and delivery of a class, I simply said that I had been looking for a more informal class, and that I would be opting out.  And I left.

But this means that my goal of a sketch a day will require an awful lot of self discipline--not my strong point.

Monday, October 10, 2016

I can't believe it's been so long!

Firstly, I had to completely re-make the exhibition piece I was planning with all of the very small squares in hand dyed green. ( I had trimmed it 1/2 inch too short for the exhibition)  Then, I was preparing to attend the yearly networking retreat and Annual Meeting of the Fibre Art Network.
                        http://www.fibreartnetwork.com/ 

This event can be held anywhere in Western Canada, and this year was local.  It was my pleasure to assist with the planning, although in a minor role.  This is a wonderful event, filled with individual artist presentations, lots of networking, field trips, and a great deal of major planning regarding the running of the organization.  It's one of the most stimulating things I do for my creative self.

One of the things talked about was the need for professional artists  to develop, and follow, a plan for their own individual professional life.  This will, of course, include the artist's individual long and short term goals.  This is something I've neglected for the past few years, while I was dealing with health issues.  Today, I sat down to take a look at this, and realized that my main goal is to be alive in five years, and healthy enough for social activity.  Now, I'm not being silly about this.  So, my intent is to improve or maintain my physical and mental health.  Physical Health is personal and somewhat self evident. Under Mental Health is my need to be creative, part of which is my need to have an active social network, as my social life consists primarily of the people and activities essential for my creativity.

This came as a bit of a surprise, as I've often felt guilty for attending social events, as it took time away from the studio.  Now I realize that these same social activities are essential to me, and well worth the time I devote to them.

Wednesday, September 21, 2016

And now for something entirely different....

Last weekend I took a workshop in Polymer Clay-Complex Canes.  This wasn't my first workshop, but I tend to make a bunch of stuff and then leave the clay alone for lengthy periods of time.  So what does this have to do with Needle and Thread?  I love to use the clay items in both my hand work and art quilting. Sometimes I use pieces as a focal item and design an entire small piece around them.  This is particularly effective if I use a background of needle felting, hand embellished , and then add a clay button or cabochon as the focus.  These pieces are usually about 8" by 10", and have sold well at craft and art shows--so well that I have none to show.

I also make beads.  One of my signature techniques of the use of mass beading on some of my more art-y pieces.  I love the challenge of making the pieces, and many of them have sold well, and for a good price. Again there is no picture, as I lost them all in a computer crash.  Oh Dear!

Well the best bet is to show you the items I created this weekend.
Beads, Cabochons, and some molded pieces. 


 Using the mold is very useful.  While one of the best features of the clay is the vibrant colours available, all polymer clay items can be painted with acrylic paint.  I've even toyed with the idea of using gold leaf on it. The grey faces are headed for the next reliquary I make, and the white ones may come into use, if the grey ones aren't quite right.  The discs are headed for a small embroidery.  The beads will just go into my collection of beads, to be used when the right project turns up. ( Oh do I have beads, more than I'll ever use, but great fun to play with!) The flat pieces toward the upper right of the photo will likely become focal pieces in smaller works.  I've got to think about the flat molded pieces, but tend to think they might end up in a reliquary as well.

And I still have lots and lots of clay to play with.

I plan to link this with The Needle and Thread Network.

Wednesday, September 14, 2016

Starting over

With the exhibition piece "going south", ( see previous post)  I decided to take a bit of a break before starting over.  This piece has been bugging me to finish it for awhile.  I have a pile of hexies that I hand piece, during those few moments when I'm watching tv.  It's always a challenge to figure out what I'm going to do with them once they're pieced.  I was going to make a knitting roll (organizer) with these, but it kept telling me that it wanted to be a tote.  Since the knitting roll would take another metre or more of fabric, and I don't knit, I agreed.  I FMQ'd it using Superior Theads' Fantasia 5207--a yellow/orange/red/purple variegated Trilobal Polyester, that I've found to be a very useful and versatile thread.  I use  my take on McTavishing, but once it was finished found that the quilting disappeared into the hexies.  The whole piece looked much better on what was to be the inside than what was to have been the outside.


Above is what was to have been the inside of the piece, with the FMQ'g complete. and below is what was to have been the outside of the piece complete with FMQ'g.  The basic square ( and it must be a square) finished to about 17 1/2" square, which was then bound.


Here it is clipped together ready to hand stitch.  

 Once it was stitched, I added a twisted cord of #8 perle cotton, and a plastic curtain ring wrapped with the same #8 perle cotton, so the closure could be tied, as well as a small carrying handle.

The finished tote is large enough to hold a hand work project and supplies.

I plan to link this with The Needle and Thread Network

Sunday, September 11, 2016

Disaster!

Finished quilting my exhibition piece.  Very nice, I was well pleased.  Then to trim it.  I mis-calculated , and cut it 1" too short.  I cut it exactly as calculated and measured, but my calculations were wrong.  A whole week's work down the tubes. After some bad language, and a trip out to Starbuck's to defuse,  I sat down to talk to myself and ask " What now?"

Well, it's not a large piece.  I can probably start over again, and may well have enough fabric to re-make it.  I had used all hand dyes.  What a waste!  However, I don't have to have it in to the show until late December.  Lots of time.  And none of the appliques had been attached, so I have them ready to go.  One thing that I struggled with, and had to re-do was the actual size.  I had to add to both the length and width, and that can sometimes show.  So maybe not so much of a disaster.

But, not today.  For today, I think I'll sit down and read a book, maybe listen to soft music, and generally relax.

Tuesday, September 6, 2016

More green

The leaf prints came out very well, and I ended up with many more than I will use in the current project.  I plan to applique them onto a pieced background, and am now piecing that.  I have cut the squares 1 3/4 " by 1 3/4" so that they will finish to about 1 1/4".  

I have a  "portable flannel wall" made out of a piece of 2" thick styro-foam, 2ft by 4 ft.  I can take this anywhere I want to work, and lean it against a table or chair.  I did this, and then sat in front of it to arrange the squares in a good array.  They were then pieced, row by row.  Here it is in progress, and a close-up of the finished rows.  All of the fabrics are hand dyed, most of them by a low water immersion process.  I have tried to create a slow gradation from light to dark, from top to bottom, of the piece. Sorry about the poor colour in the close-up, The first picture is close to actual colour.  I had trouble with the flash, and the second one got over exposed.  I didn't realize that until I actually posted them.


As the finished piece will be entered into an exhibition, I won't be able to post it when it's done.  Sorry about that.

With the left over cut squares, I plan to piece them together into a square about 10" by 10", to use as a "doodle cloth" to try a couple of different options for quilting the piece, and for attaching the leaf prints.

I plan to link this with The Needle and Thread Network

Wednesday, August 31, 2016

Leaf Prints

There are a couple of small pieces on my worktable that I feel call for leaf prints, so today was the day.  The tree the leaves came from is very high, and my poor husband had to use a very long extension handle to knock the leaves off, but we got some very nice one, and the right size too!  We also discovered that the tree is infested with aphids, but that's another story.  

Since my current interest is in colouring and using older cotton Damask table linens, I used a large napkin that had been very gently treated in its past life, and was in pretty good shape.  I still stabilized it a bit with spray starch on the reverse side.

I'm very pleased with the result. My work space is fairly simple, a piece of glass to use as a palette, a bucket of water, two brayers, textile paint and textile medium, paper towel, and, of course, a bunch of leaves.  The fabric is stretched over a single layer of batting.  I put the leaf in the paint, wrong side down, cover it with a paper towel, and firmly press or roll ( using a clean brayer over the paper towel)to make sure all of the back is covered with paint.  Then, carefully lift the leaf off, position it on the fabric, cover with paper towel, and press again, ( using a clean brayer).  You'll notice that the fabric is marked to help position the various leaves. After they dry, and are heat set, I plan to stabilize the fabric with a light weight stabilizer and cut them apart with pinking shears.  They can then be raw edge appliqued over a pieced background.


I plan to link this with The Needle and Thread Network.

Sunday, August 21, 2016

Today's progress report

The hand work continues, but I've also had a bit of studio time.  I mentioned that I had taken a Craftsy class, believing that the techniques might be useful in a sort of commission I have.  The next step was to design a piece to test the techniques, and see if they would suit one of my designs.  Well, I've finished that piece and am quite happy with the result, although it will never be suitable for any exhibition ( it's somewhat derivative, and there are a couple of places where the workmanship isn't quite up to snuff-mainly in the machine work)

Here it is, a full view and a close-up.  It is about 22" by 18".  The background is painted, and some of the fabrics are hand-dyed, while others are commercial, mainly batiks.


While all of this was going on, both my main, basement studio and the auxiliary upstairs studio have become a bit messy--quite a bit messy.  There is usually a short  "tidy up" ceremony whenever a piece is finished, and today's the day. 

Then, finally, I get to sit down and prepare a working pattern for the commission piece.

I plan to link this with Off the Wall Friday, and The Needle and Thread Network.

Tuesday, August 9, 2016

WIP_Hand work

The last few days have been mainly dedicated to watching the Olympics.  This means a chance to do a bit of hand work.  Usually I only watch tv for an hour a day, or less, so hand work can mean weeks or months on one project.  But there are now two projects getting close to completion.

The first is going to be a needle roll, used to store knitting needles and accessories.  I have patterned this to be similar to a roll I made to store my good quality paint brushes, that  works well. This latest one is at the stage of machine quilting, prior to adding the pockets to the lining.  The hexies are 1 3/8", and the overall size is roughly 17 5/8" square.  This will be more precise after the quilting is finished, but before the navy blue binding goes on.


The other piece is going to end up as some sort of tote.  It's been many years since I tried any Cathedral Window piecing.  ( Maybe 35 years?) I had a recollection of how I was shown to do it, but checked the internet.  Found absolutely nothing that agreed with the method I had been taught. So I had to "wing it".  Everything I remembered and saw on the internet told me that the squares were 6 inches square, so I cut all my backing squares 6".  I think what the actual instruction meant was that the finished size of the square would be 6".  My finished squares are 2 1/2".  Imagine trying to do the final diamond applique in that dimension!  However, it should be ready to assembly within a day or so, if the Olympics stay as interesting as they have been.  As you can see, the bottom of the bag will be squared off, but I'm thinking of adding fabric to the top, and then gathering it as a Draw String bag.  I'm dithering over whether or not to put handles on it.  Unfortunately, some of the appliqued square will end up on the bottom of the bag, and, if I do this again, I will design it differently.  The bag should end up about 25" around from top of one side to top of the other, and about 12" across  each side.  This will be lined in plain brown cotton.


 I plan to link this, as a WIP, with The Needle and Thread Network.

Monday, August 1, 2016

Finished

The class project is finished, but I won't be showing a picture, as it's not my design.  It proved quite a challenge.  The issue was a familiar one to me--value.  Gets me very time!  My colours were basically  too much the same--a medium dark-- but there was one area, sky and water, that was light enough to provide contrast. So the whole piece was acceptable, although I'll never show it, not being my work.  So I put the binding on and stood back.  OMG!  One section was so much lighter that it stood out terribly, and it wasn't the focal point.  At this point, I would have done anything to get it off the work table, so out came the coloured pencils.  The area was darkened just enough that it fit in with the other colours, and I can now call the piece done!

So, did I learn anything?  Yes, I did.  This evening, I went back to the project with which I was wanting the help, to start with, and I think my approach to it has changed significantly, and for the better.  I have a much better idea of where I'm headed. 

Wednesday, July 27, 2016

Frustration

The past couple of weeks have been somewhat frustrating.  Last weekend I taught a two day Machine and Free Motion Quilting class that went well.  As there always is, there was one troublesome student, but she had been e-mailing me in the weeks leading up to the class and I knew she might have problems.  

I have come up with an idea for a project, my own design, but using some techniques borrowed from a well know teacher.  I treated myself to an internet class she teaches, to see what I could learn about how she approaches these techniques, as I have only read about them. I have been following along the class project, and am finding that I haven't been this frustrated in years.  Now I have to figure out if it's me, or if the techniques are not as easy as she makes them out to be.  Some of the difficulties may also be my unfamiliarity with some of the materials used.  

One good thing to come out of the class is that I was forced to buy some commercial fabric.  I haven't bought commercial fabric in years, but off I trotted to the LQS.  What fun!!  I had no idea how the quilting world has changed in the past few years.  It was like a combination of "Alice in Wonderland", and Christmas, all in one day.  I rationalized the whole thing by telling myself that the fabric might also be useful in the planned project

Wednesday, July 13, 2016

A bit of fun.

This piece was just an experiment, mainly about how to handle and finish something with a very loose form and raw edges.  I ended up stabilizing with an iron on stabilizer, especially after deciding to add the buttons, as a focal point.  The raw edges baffled me for quite awhile until I happened on a mention of felt.  While it isn't quite finished, the plan is to stitch it to a double layer of felt, leaving about 1/2" of the felt showing all around the edges.

I plan to link this with The Needle and Thread Network

Sunday, July 3, 2016

Derailed Intent--finished!


This is a relatively small piece-only 19" by 21".  I loved the way the mandala came out of the dye bath, but have been having difficulty figuring out how to quilt any of the ones I've made.  I decided that this would be a good size to experiment with.  It is faced rather than bound, and will fit my new hanging systems quite nicely.  The title comes from the fact that the finished piece/design is not at all what I had planned, or expected, it to be.
While working on the quilting, I decided that the centre portion needed something more, and decided to bead it in a "sunburst " configuration.  Now, having seen it in the photo, I'm thinking that I need something in the very middle.  Not sure what that may be but I'm leaning toward a group of maybe three larger blue beads, as are around the edge of the sunburst.  The marking lines are obviously a problem, but aren't nearly as prominent as they appear in the photo.  I'll know to use a different method, if I do another.


I plan to link this with The Needle and Thread Network 

Cleaning Ritual

Having finished a piece, I have a ritual of tidying the studio.  I'm a messy worker, so this is also a very necessary step.  Because we're in the middle of renovations, there was also a lot of extraneous stuff in the room.  I was clearing out a pile of project boxes and came across a loose pile of 33-1" hexies, cut, but not yet basted.  I also found two boxes of already basted 1" hexies, so decided to baste the last few and put them in with the others according to colour groups.


Imagine my surprise when I realized that, the ones I basted to cardstock today, weren't compatible with the ones in the boxes, which had been made by the circle method with no cardstock involved! The cardstock ones are just a "smidge" over 1" and the circle-based one just a "smidge" under.  
        I guess I'll have to figure out something else to do with them, maybe a new draw-string bag for my Rune stones?

Tuesday, June 28, 2016

Finally a finished piece!

Well, we're up to our ears in kitchen renovations here, but I've still managed to find a few minutes in the studio.  I have a Machine and Free Motion quilting class scheduled in a couple of weeks, and like to beef up my technical skill a bit prior to class.  Awhile back I showed the pieced top comprised of various hand dyed mandalas that just didn't work out.  Since this will probably end up as a charity piece, I've used it to practice my quilting, and ended up with a bit of a sampler.

Here is the piece, finished with a traditional binding.  It is about 38" by 38".The red and turquoise are commercial fabrics, but everything else, including the backing, is a hand dye.

And here are a couple of close-ups of the back.


Since I've also had a goal this month of "loosening up" a bit, I didn't sweat the starts and stops.  If I could get away with it, not every loose thread is tied and buried.  :)

I plan to link this with The Needle and Thread Network and Nina Marie's  Off the Wall Friday.